I’d parked overnight in a layby at the east end of Loch Tay at Kenmore and took a swim in the morning sunshine alongside several other morning dippers. Slipping into the cool, clear water of the still loch was a refreshing way to wash away the remnants of sleep. Meanwhile, Millie danced around at the waters’ edge desperate for me to come out. She’s a paddler not a swimmer.
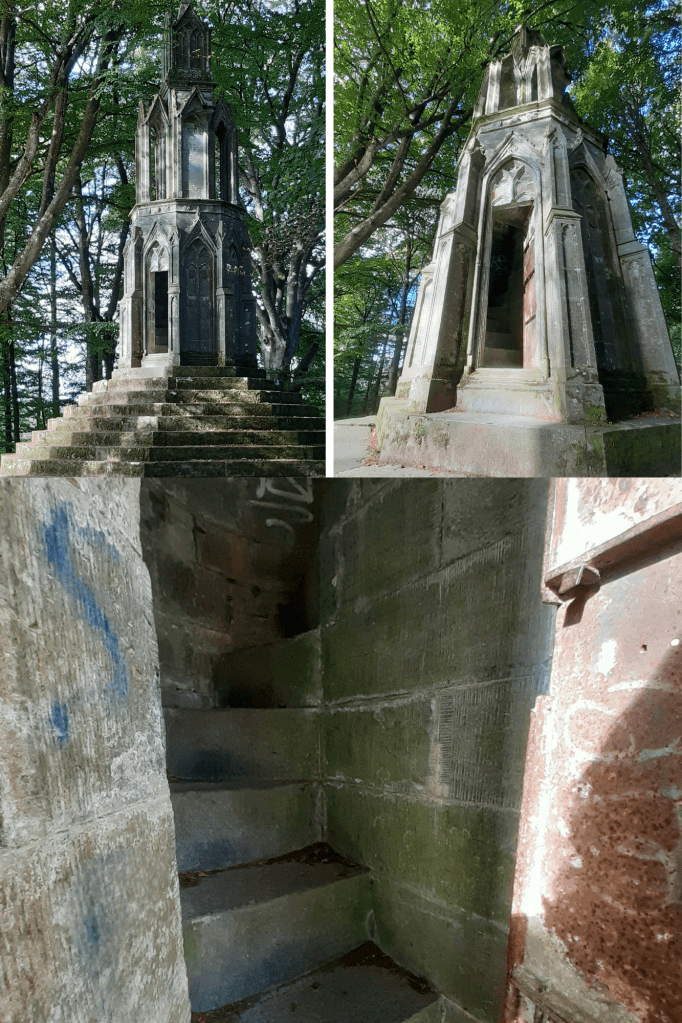
I’d brought my Children camping to Kenmore over the years so it evoked happy memories to be visiting again. There are lovely walks around this area and so Millie and I set off on a jaunt through the woods to take in the Eleanor Cross and onward towards Aberfeldy. The pathway starts by the bridge at the mouth of the Loch and meanders along the north side of the river for a while then heads up the hill through the woods. The Cross was commissioned in 1831 by Lord Breadalbane in tribute to his beloved wife Mary. At that time it would have had a view of the hills and down along the valley with beautiful vistas of the River & Loch Tay. In all these many years however the woodland has grown up high into beautiful mature trees with birdsong echoing through them.
Eleanor Cross is built on the site of an old summer house known as Maxwell’s House. It stands 30 feet tall with a 9 step octagonal base encircling it, a cruciform mid section and a square pinnacle top surmounted with a cross. Delightfully, a door on its south side opens to a spiral stairway. This leads to a small open-air arched gallery surrounding the structure. Climbing up the steps, it feels like a childhood adventure to reach the platform and look through the trees at height. Sadly the interior has been sprayed with graffiti: evidence of bored minds and idle hands.
A brass plaque acclaims – This Building is Dedicated to my Faithful Friend and Fellow-Labourer, MARY, COUNTESS OF BREADALBANE, whose maternal care has been extended to all around this place. anno domini, 1831.
I’ve been as yet unable to ascertain why this particular monument was named ‘Eleanor Cross’ so for the moment will surmise that the reason was purely a romantic gesture in keeping with Breadalbane’s status and the era. (The Victorians were fond of building ornamental ‘follies’ and they can be found throughout Scotland in beautiful rural settings.) NB: King Edward I of England had twelve Eleanor Crosses erected as markers built along the funeral route taken by his wife Queen Eleanor of Castile. They marked the nightly resting places of her coffin procession from Lincoln to Westminster Abbey in 1290.
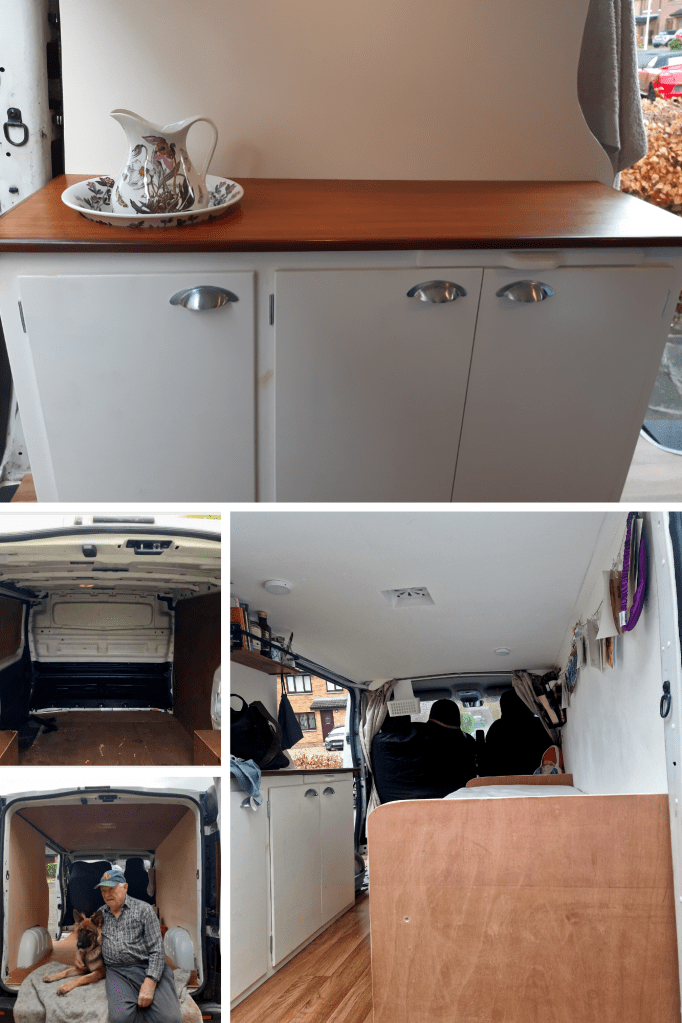
My car was becoming much too cramped for a rapidly growing Millie so I decided that a van would be the perfect alternative, not just for Millie, but something that I’d always wanted and better suited for my outdoor activities. I looked at several vans and settled on a Renault Trafic then got to work adapting it to suit. My Dad was 91 at the time and as a retired carpenter, relished having a new project to get his hands on, albeit at a much slower pace in keeping with his age and hampered mobility.
1st steps – after removing the bulkhead and ripping out the filthy and broken 5mm plywood lining, I gave the van a thorough cleaning. As ventilation is paramount, fitting an air vent was the first item to be addressed. I have to say, it was probably the most stressful part of the whole exercise. Cutting a hole in a perfectly good, solid roof was nerve-wracking and absolutely had to be done right first time. After much ‘debate’ and a wee bit of swearing about measurements my Dad and I settled on drilling numerous small holes around the circumference of the area to be removed. Fortunately, the perforated area popped out easily with a quick thump from a hammer. A heavy duty file and the sander removed and smoothed the rough edges then the area was primed with rustproof paint. The vent fitted perfectly, was screwed into place and the rim, inside & out sealed with silicone to make it watertight.
Insulation – I fitted sound deadening mats which were stuck to all flat areas around the interior to reduce vibration and noise. Then, all the cavities, recesses on the walls and ceiling were filled with loft insulation, the whole lot covered over with insulating foil and fastened into place with foil tape. Ridges on the floor were filled with strips of insulating bubble foil then covered over with radiator reflective foil. (I found that using carpet adhesive spray to hold everything in place as you work, keeps all in situ as you go along).
Strapping and fitting the new ply lining – The ply flooring went down first (10mm thick, cut to shape plywood, using self tapping screws – countersunk). Then, as luck would have it my brother arrived from NZ, got his sleeves rolled up and with my Dad, set about installing the strapping for fixing the plywood lining to the inside of the van. The strapping is made up of cut to size, 40mm x 20mm battens. Using truss head, self tapping screws for better hold, 5mm ply for the ceiling was fitted into place. Lastly the walls went in (10mm cut to shape ply, fastened with countersunk self tapping screws) also acting as additional support for the ceiling. Once checked to ensure they were tight, all countersunk screws were covered over with wood filler then sanded for a good finish.
Flooring – PVA glue was painted all over the floor to seal the wood, then once dry, flock-backed vinyl flooring was cut and fitted using, again, carpet adhesive spray.
The Fixtures – my Dad made a 1950’s style mini kitchen unit using leftover wood from the battens for its frame and plywood off-cuts for the facing. It has inner shelving so affords plenty of space to store groceries, cooking equipment , utensils, plates & mugs, etc. There’s also a pull-out chopping board. The counter top of the unit had been the top of my Great Aunt’s teak dressing table which I’d been storing in my loft for a very long time and in reality, was a piece of furniture I was never going to use. I think it looks superb and I hope she wouldn’t have minded. A circular hole was cut in the left end of the counter top which my Portmerion bowl and ewer fits into nicely. The pull out sofa bed, I made using battens and 10mm x 70mm cut to length wood for the interlocking slats. The bed ends were done with more plywood. There’s ample space underneath the bed for storage where I use laundry baskets for some sort of semblance. A double foam mattress was cut to size (I found that a serrated bread knife worked best for this job) and I used 2 x king size mattress protectors as covering for the pieces needed. The bed is super comfortable, by the way!
Electrics – I studied several tutorial videos with the intention of installing leisure batteries. While I’m confident in my woodworking abilities, I cannot say the same when it comes to anything to do with electricity. In the end I shelved the idea of fitting leisure batteries and went with a much more simple option. My lighting, magnetic touch lights, is rechargeable and this can be done from the van’s 12V socket. To be honest that’s all that’s required. I have a rechargeable lamp which is only ever used as back-up and I cook with a portable gas stove. I did invest in a portable power station, however, it’s only required if I need to use my hairdryer, to perhaps recharge my in-car DVD player or charge up my mobile phone if I’ve forgotten to plug it into the 12V socket while driving. For me, keeping it simple works best.
Other Items – The most useful item I purchased was a Porta Potti. Not having to desperately find a place ‘to go’ or not having to trudge to campsite toilets during the night (especially if it’s raining) is nothing short of bliss. If you have space for it, definitely buy one. A rechargeable camping shower was a gift from my Son, so if I haven’t been for a cold water swim or need to wash my hair, then it’s certainly a great little item.
Reading this back, it all sounds so incredibly straight forward. However, if you’re going to modify your own van, bear in mind there are always going to be challenges in a project like this so be sure to plan everything out and take your time, especially in making sure your measurements are correct. Mistakes can be costly.